Tuesday, June 26, 2012

Crock Pot Honey Sesame Chicken and Roasted Parmesan Green Beans

Today is my day off. We have a lot going on around here this week, including a showing of our house on Friday!! I'm bustling around here today, trying to get things done. I have plans this eve so I want to do something quick in the crock pot for dinner. I'm about to head into the kitchen to start on one of our favorite meals. The first time I made it, Babe said it was the best meal I made since we got married! So it's definitely a hit around here!

CROCK POT HONEY SESAME CHICKEN
recipe form: Baby Center / www.chefintraining.com
Ingredients:
2.5 pound boneless, skinless chicken breasts (I use thighs)
Salt and pepper
1 cup honey
1/2 cup soy sauce
4 tablespoons diced onion
4 tablespoons ketchup
2 tablespoon canola oil
2 cloves garlic, minced
1/2 teaspoon red pepper flakes (optional)
4 teaspoons cornstarch dissolved in 6 Tablespoons water
Sesame seeds (I never seem to have sesame seeds so I just skip them)

Season both sides of chicken with lightly with salt and pepper, put into crock pot. In a small bowl, combine honey, soy sauce, onion, ketchup, oil, garlic and pepper flakes. Pour over chicken.
Cook on low for 3-4 hours or on high 1 1/2 – 2 1/2 hours, or just until chicken is cooked through.
Remove chicken from crock pot, leave sauce. Dissolve 4 teaspoons of cornstarch in 6 tablespoons of water and pour into crock pot. Stir to combine with sauce.
Replace lid and cook sauce on high for ten more minutes or until slightly thickened.
Cut chicken into bite size pieces, then return to pot and toss with sauce before serving.
Sprinkle with sesame seeds and serve over rice or noodles.
As our veggie to go with the chicken: Roasted Parmesan Green Beans 
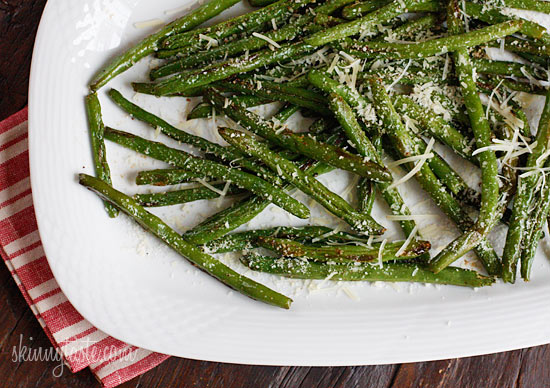
 
Skinnytaste.com


Ingredients:
  • 12 oz green beans, trimmed (make sure they are dry)
  • 2 tsp olive oil
  • kosher salt + fresh cracked pepper to taste
  • 1/4 tsp garlic powder
  • 1 1/2 tbsp shredded parmesan

Directions: 

Preheat the oven to 425°F. Line a baking sheet with aluminum for easy clean-up.
Lay green beans out on the baking sheet and drizzle oil over them. Season with salt, pepper and garlic powder and toss to evenly coat.

Spread them out on the sheet so that they all lay flat and place on the lower third section of your oven. Bake 10 minutes, shake the pan to turn; bake 5 additional minutes. Remove from the oven and sprinkle with grated cheese.


Enjoy!

Wednesday, June 20, 2012

Invigorating Coffee Scrub


Did you know that many face washes contain alcohols that actually dry out your skin, causing further irritation? 
(I found this site with helpful hints on good and bad alcohol in skin care products)

I have been blessed with fairly low maintenance skin. As a teen I used face washes (because it was the thing to do), but now, I generally just use warm water and a face cloth. Occasionally I feel the need to exfoliate and remove dead skin cells. Recently I was on the hunt for a scrub for my body and face. I discovered this website and the below recipe. 


Invigorating Coffee Scrub
Brew a fresh pot of coffee. 

Use 3 tablespoons of the fresh grounds and 1 tablespoon of salt and mix in a bowl.
Gently scrub mixture over body within 20 minutes of brewing before oxidation occurs.
(I personally keep a jar of this mixture in my shower. The grounds are not always "fresh" but I still get the exfoliation and the Vitamin E action.)

Coffee contains Magnesium and Vitamin E. It also acts as an antibacterial, exfoliating and stimulating agent.


For my face moisturizer and body lotion, I use coconut oil. Because my skin is on the dryer side, I can use it on a daily basis. If you have oily skin, this may not work for you. I also use coconut oil as a makeup remover! Put it around your eyes and gently remove makeup with a cotton ball. You get makeup remover and moisturizer in one! 


Have you discovered any helpful hints on skincare? Do you possibly disagree with the article on alcohol and skincare? I would love to hear feedback!

-A

Monday, June 18, 2012

Father's Day and the NEXT STEP in our moving process


My parents are staying with us right now on their visit from Texas. Which means I got to spend Father's day with my dad! I am extremely blessed to have a God honoring man for a father. We may not always see eye to eye, but I am and always will be a Daddy's girl. 


Our house has been on the market as of the 1st of May. We listed it on some housing websites, craigslist, etc. But yesterday, the official for sale sign went up. I'm not sure whether to dance around in excitement or cry. I am beyond excited to move, but at times I sort of freak out and want to stay in my comfortable little hole. 


People keep telling me when you don't know what's next, it's a good time to trust in God and let him lead you. That is WAY easier said than done for me! Yesterday's message at church was exactly what I needed to hear . . . Pastor Josh talked about how our plans are second best to God's. And not like silver medal second best. Like worlds a part second best. If we allow God to direct us, his plans for our life far exceed anything we could ever possibly come up with for ourselves. Why is it so hard for us to release our agenda and let God lead us? As Babe and I move ahead with plans, we take a step at a time, a day at a time. 

Ultimately we want His plans for our lives, even if they seem big and scary. 

-A

Thursday, June 14, 2012

homemade shampoo

I finally found a more natural than store bought, homemade shampoo that cleans, LATHERS and  makes my hair manageable!


I have been coloring my hair since I was 13. Since getting married and moving into a house with hard water, my hair was dry, brittle and dull. No salon product I tried seemed to help. I have many hair stylists as friends and family and for years have sworn by name brand, salon products. Which is probably why it has taken me so many tries to find a DIY shampoo I like! I also have not colored my hair since October of last year and actually LIKE my natural color (I forgot what it was!) . . . I no longer have dry or itchy scalp and my hair is softer and less brittle.


Coconut Shampoo

Use equal parts:
- Liquid Castile soap, any fragrance! (can be found at health food stores or SaveMart)

- Coconut Milk (store bought or homemade - see recipe below for homemade)


Put in bottle and shake gently. 

Tips:
- I made my own coconut milk using this recipe. I think homemade is better because you get the oils out of the coconut. But you can buy coconut milk too, just make sure it's the unsweetened.
- Making small batches of shampoo at a time is better. It will ferment over time if left in too warm of a place!
- I prefer a squeeze bottle such as the one pictured below. Because the shampoo is so liquidy, it's easier to pour directing onto your hair in small amounts than to pour onto your hand.  

- The original recipe that I found also called for olive oil. I tried that and it made my hair so oily and unmanageable! By making your own coconut milk, you do get coconut oil as well (you'll actually see the oils rise to the top of the "milk" if left sitting for a bit).


 I do still use a conditioner. The shampoo leaves your hair feeling (literally) squeaky clean and a bit tangled. I found a conditioner, thanks to my amazing researcher of a mom, that doesn't have all the harmful alcohols or any sulfates in it. It's by Kiss My Face and it's the Whenever Conditioner. Works great! 


I hope this was informative and helpful!! Would love to hear your comments about this recipe or recipes you have tried for shampoo!

Monday, June 11, 2012

Wedding card "album"

I was so excited to use an idea I saw to make an album of sorts for our wedding cards!
This afternoon I came home from work and excitedly made the front and back cover of the album.

And then went digging in our closet to find the box of wedding cards . . . . .


THIS is the box of wedding cards. I had sort of forgotten that we had 300+ people invited to our wedding. There are probably at least 175 cards in that box. There is NO WAY they will nicely fit into one decent looking album. So I stashed them back into the closet until I find another creative idea for them . . .


I kept the front and back cover for another project someday.
(Anyone have any other creative ideas for wedding cards??)


Here is the original idea I saw . . .


If you try this with your wedding cards, I'd love to see pictures!!!

-A


Saturday, June 9, 2012

Honey Strawberry freezer jelly

I live in a farming community where we have access to fresh produce a good chunk of the year. A favorite of mine growing up was always homemade strawberry jelly. My mom would make a large batch and store it in the freezer to last us the year. Oh yum!

My first year of being married I wanted my mom to help me make my own batch. I never realized the amount of SUGAR that goes into one batch!!!! WOW. It's like equal parts sugar and strawberries. I was determined to never make any of that sugary stuff again unless I could find a healthy alternative recipe. AND I DID (thanks to my best friend, Pinterest.)

I'd love to share it with you!


Honey Strawberry Freezer Jam
Makes about six 8-10 oz. jars
4 pints of strawberries (about three pounds of berries)
1 cup of apple juice
1/2 cup of water
1 package of No Sugar Needed Pectin
1 T lemon juice
1 cup of honey (I did 1 1/2 cups)
1.  Clean and stem berries.  Mash one layer of berries at a time in a large bowl until all berries are mashed.
2.  In a small saucepan, whisk together apple juice, water, and pectin.  Bring to a hard boil and boil for one minute. (Make sure you stir very well so you don't leave any pectin on the bottom)
3.  Add honey and lemon juice to berries and stir well.  Add in hot pectin mixture and stir well again to make sure everything is combined.
4.  Ladle into clean jars (glass is fine) and screw on lids.  Let sit in the refrigerator for a few hours to set up and then transfer to the freezer to store. (I used plastic freezer containers)


I used this recipe this week. I doubled the batch, added a little more honey (see note in recipe) and let it set in the fridge 24 hours after making it, before I froze it. It turned out perfect!!! I could eat the stuff by the spoonful, it's so sweet and yummy!!!!

If you try this recipe, I'd love to hear how you liked it!

Happy freezing.

-A

Friday, June 8, 2012

Blog re-launch!

I'm coming back!


For this season in my life, I have given up Facebook. Probably temporarily, but who knows!


I have realized a passion of mine is nutritional living. Healthy, tasty food that benefits your body as well as other natural remedies and recipes for the body and home. I have had many people ask me for recipes to things I've made or mentioned. And so, I will dedicate my no FB time to this blog, mainly to promote healthy living and helping others in this area!


I would love to hear your feedback from things I post! Even if it's something you disagree with. I am still very much learning all about being healthy and love hearing about other people's discoveries too! 


Here goes a new adventure :)


-A